I can already tell this is going to be a great week! For one, our master bathroom feature in Cottages and Bungalows magazine comes out tomorrow! I can hardly contain my excitement to see how it turns out.
A couple months ago an editor with the magazine emailed me that they were compiling a gallery of bathrooms of those that do not live in a historic house but want historic charm and character. I was thrilled when she wanted to include ours!
Here is what we started with...
 |
Looking into the master bath from the master bedroom before we moved in {say hello to Sadie!}
|
 |
| Can you tell the previous owner reeeealy like blue? |
 |
| The sink, toilet, floors, walls, rugs, and even the inside of the door were BLUE. |
 |
Our quick fix was to replace the toilet {much better!}, paint the walls a light grey, and add a white rug.
|
 |
| Vintage charm, right? |
 |
Then we spotted this beauty at a local store. It was just what we had in mind for the master vanity.
We went home to measure our space, bought it the next day, and our master bath remodel was officially underway. |
We wanted something that looked like a piece of furniture, had storage {i.e. drawers, shelves}, and wasn't one solid piece. Since our bathroom is so tiny we wanted something "leggy".
 |
| Ahhh, marble - how I love thee |
 |
| And so the fun begins! |
 |
| Destruction starts... |
 |
| A little moderation on site needed but nothing handy hubs can't fix! |
 |
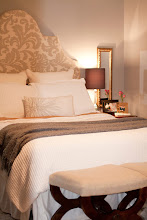
| The reality of renovating - this was part of our bedroom decor for a week :) |
 |
| Looots of trips to Lowes |
 |
| And lots of painting! |
 |
| Beadboard - going white |
 |
| Out with the old... |
Ooh, and this was weird...
 |
| This was inside of our medicine cabinet. Needless to say we were VERY careful when we took it out... |
 |
| So strange. Who does this? |
 |
| Ready for a makeover! |
 |
| Nail gun is out! |
 |
| Beadboard is cut and brought up to its new home |
 |
| That's right... straight over the tile -- Liquid Nails we love you. |
The process of putting up beadboard over tile was not as easy as we imagined, and it took much longer than we expected since we obviously couldn't nail into the tile. So one week and 10 tubes of Liquid Nails later...
 |
| No more wall tile! |
 |
Ryan took the marble top to a local granite shop to have the drain and faucet holes cut.
Then it was time to glue on the vanity {we used clear silicone} |
 |
We decided that we liked the original blue floors once everything else in the bathroom wasn't blue.
So in an effort to save time and money we kept them. We love the result!
It's just the pop of color our little bathroom needed! |
Stay tuned....
Tomorrow I'll show you the finished product!
PS- I wanted to give a special thanks to Emily A. Clark for posting about Living Room Reveal! Her blog is one of my absolute favorites, and I was so flattered. You can check it out {
here}!


looks great so far!! {p.s. my parents had the razor drop thing in their bathroom too.... they have a really old house, so i guess that was just the thing to do back then??}
ReplyDeleteblair @ scsd
Who ever thought the razor drop was a good idea? Gross!
ReplyDeleteLooking forward to seeing the rest of the room!
I have almost the same exact bathroom as you..except in PEACH adn black! Timeconsuming work I'm sure, but it looks great so far.
ReplyDeleteHeather
www.thelovelycupboard.com
I have the same style bathrooms in different colors. I even had the razor blade disposal in our hall bath! The changes so far are great.
ReplyDeleteI'm your newest follower from the Mustard Ceiling's party. Stop on by when you get a minute. http://directionsnotincluded.blogspot.com/
SO exciting that your bathroom will be in a magazine feature! It's looking great in these photos and I cannot wait to see more of it! :)
ReplyDeleteHope you had a great weekend!
So excited to see this all done! Looks great so far! We had a bathroom very similar to that in our last home and I totally wanted to do the beadboard over the tile but then we moved and now it's not our bathroom anymore. Your living room is also amazing! Stopping over from The Mustard Ceiling and now a follower. Looking forward to checking out your blog.
ReplyDeleteCongratulations on your upcoming feature, so exciting! I am quickly becoming one of your biggest fans...you're ideas and projects are absolutely fantastic. I am loving the way this one is turning out too. Our bathrooms look very similar and I have been dreading the remodel. We are not in our forever home, so I feel we are limited in how much we actually do, bead board would be a perfect solution.
ReplyDeleteThank
Wow! I'm so impressed! I can't wait to see the finished product tomorrow :)
ReplyDeleteIsn't it amazing the details some people added when creating these rooms years ago? I've never seen anything like that razor blade drop. And you win the award for the best cliff-hanger!! Ahhh...I can't wait to see the final makeover! And congrats on your magazine feature - that's so exciting. AND, having done a bathroom renovation ourselves - can't believe you were able to beadboard over the tile. Wait until I tell my husband!
ReplyDeleteomg! i had no idea you just covered up the tile with bead board! genius!!!
ReplyDeleteLove it! I'm so excited to see the final look! What a great find, I"m guessing that vanity is from Nadeau? I think I recognized the tag!
ReplyDeleteWowza! I can't wait to see the final reveal! I am visiting from The Mustard Ceiling. Thanks for sharing!
ReplyDeleteLiz
Wow! It looks great so far! I can relate to the blue bathroom blues - mine is also very blue right now :) Can't wait for tomorrow's post!
ReplyDeleteHi,
ReplyDeleteI have just come across your blog via The Mustard Ceiling, and will be adding you to my blog roll at http://www.lminteriorsllc.blogspot.com
The renovation looks great-can't wait to see the rest!
If I wasn't already completely impressed with your revamping skills, I would be completely bowled over...I can't wait to see the finished product...and a magazine feature??? Get down with yo' bad self!!! (c:
ReplyDeleteCannot WAIT to see the final product...looks like a lot of TLC went into this bathroom!
ReplyDeleteGenius! I have been brainstorming with my cousin on an easy way to cover up the pink wainscoting tile in her bathroom, and this is the perfect inspiration! I can't wait to see the final result!
ReplyDeleteEven though I've seen the real thing in person, I cannot wait to see the magazine feature tomorrow!!! So proud of the Grays :)
ReplyDeleteHow exciting to be featured - from what I have seen so far I can see why - it looks beautiful! How clever to put the beadboard right over the tile. And yes, very, very weird on the razor blades situation.... Thanks for your nice comment on my blog!
ReplyDeletehttp://bjdhausdesign.blogspot.com/
So excited to see the reveal and congrats on the publication! I am an excited new follower from Mustard Ceiling link-up! Glad I found your blog!
ReplyDeletehttp://homestyling101.blogspot.com/
Wow! Y'all have done a lot of beautiful work! Love it! I found you through Emily A. Clark's blog. Can't wait to see more!
ReplyDeleteHey! Super proud of you and Ryan (and Sadie). All my friends are becoming famous bloggers. I did want to tell you that in our old house, BOTH bathrooms had the same razors in them! Our old house was built in 1954, so it must have been a trend back in the day. It's strange, but we couldn't help but think it was a pretty efficient solution of disposing of razorblades from old shavers. :)
ReplyDeleteYour reveal is gorgeous!! Thanks for showing the how to. This would be the perfect way to update our bathroom. I showed my husband and his response was "you have to stop looking at those blogs" LOL.
ReplyDeleteway to go! inspirational!
ReplyDeleteI'd love to see what you did with the shower...Thanks!!
ReplyDeleteThanks for the comment fellow Cottage and Bungalows DIYers. Wow your bath is great as well as the other 'areas you have redone. I can't wait to see more.
ReplyDeleteIt's great to see that you got a beautiful result without having to rip everything out. Absolutely gorgeous!
ReplyDeleteMany many years ago when men shaved with real razor blades their medicine cabinets had a slot in the back of them for the easy disposal of the old blades. It's very gross and anyone removing an old med. cabinet should take extra caution and be aware because I've seen dozens and dozens of them when removed!
ReplyDeleteNow that you have had some time with this up, how is it holding up over the tile? I am in the middle of drawing out plans for our old bathroom. This seems so much better than ripping out the tile, but am concerned of how well it will hold.
ReplyDeleteOk, I am moving to a new apartment, and my bathroom is a similar retro hot mess. I love me some retro and historic, but this fugly tile combo of yellow and blue is just...... not liveable. I love the idea of covering it up with beadboard, but I am a renter. Do you think this solution could be adapted for a rental situation? Or does the liquid nail make it impossible?
ReplyDeletePLEASE REPLY! DESPERATELY NEED FUGLY BATHROOM ADVICE!
What a wonderful idea to cover over the old with the new. We have lots of homes with pink, yellow, blue and green tile which is certainly out of date. This is a great way to bring more appeal and value to an older bath. Love it - Great job!
ReplyDeleteHow often is the bathroom used for showering; moisture level and how good does it look today? I'm curious as to how well the beaded board held up over time.
ReplyDeleteYou show the wood above the tile that you nailed the top of the headboard to but the bottom of headboard looks like it did not reach the floor. Did you just glue the bottom of the headboard to ceramic then add (glued?) Base moulding over the bottom of the headboard? I need this desperately. I have the same bathroom and have been trying to figure out economical way to lose the tile walls ! Amazing !
ReplyDeleteI wrote BEADBOARD but it keeps changing to headboard....sorry
ReplyDeleteWe are using this post as a template for renovating our tile walls and we're trying to figure out what kind of trim you used at the top of the bead board to cover the wood. Thank you for putting this out there!
ReplyDeleteThank you I am working on a kitchen with tiled back splash and this is a great fix.
ReplyDeleteLove this!! Planning on doing this in our bathroom... one question, however. What is the board nailed above the tile for? Did you attach the beadboard to it? Or the trim? Thanks!
ReplyDeleteLove love love this! Since this post was from 2011, I'm wondering if you can tell me how the bathroom is holding up. Any issues with the beadboard staying attached to the wall? Thanks!
ReplyDelete